powering a contact form with go and docker
2023-06-29
Intro
The first version of my portfolio was originally published with GitHub pages as it was a convenient way of creating a static website. However, I wanted to give users a way of reaching out to me, whether it was to share an idea or to offer me a 6 figure salary.
The simplest solution would have been to use a mailto:, but I was not comfortable with the idea of having my email address out there, waiting to be scraped by a web crawler. Instead, I created a fancy contact form back with a cloud-based solution using AWS API Gateway and AWS Simple Email Service. Unfortunately, my AWS Free Tier subscription ended up expiring and I was forced to take down my beloved contact form.
After recently acquiring a Raspberry Pi, I decided to host my website at home, in order to learn more about networking, systems operations, deployment processes, etc… Since I now had a backend for my website, I could create a service to process form submissions and send them to my email.
The Plan
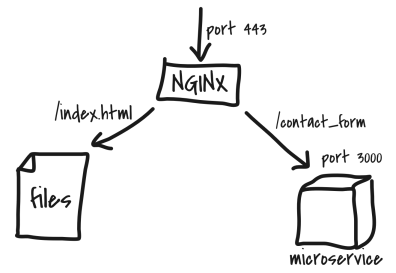
With my portfolio only consisting of a few static files, I used Nginx as a simple drop-in solution that had me up and running in no time, while also giving me the ability to route requests to future backend services, including the one we are about to implement. My plan is to have Nginx receive POST requests to /contact_form and proxy them to an arbitrary port on which my microservice will be listening.
I decided to go with Go to implement my microservice because its standard library has easy to use HTTP server functionalities and plenty of support for network protocols - specifically the Simple Mail Transfer Protocol which we’ll use later. In the end, we will be containerising our microservice to flex our DevOps skills simplify deployment, using Docker.
Implementation
Set up
Enough talking, time to get coding! Let’s create our project:
$ mkdir msmge
$ cd msgme
$ go mod init <module path>
Here, I called my project msgme but you can pick any name. Also note that if you are creating your project in the GOPATH, you can omit the module path. Otherwise, you probably will want to use the address of the repository storing your module for good measure.
Next, let’s add a library to our project: godotenv. It will enable us to use a .env file to store our parameters and credentials.
$ go get github.com/joho/godotenv
If you are thinking of committing this project to your own GitHub, make sure you add the .env file to your .gitignore so that you don’t accidentally share your credentials with the whole world. Now create the .env file write the following to it:
PORT=3000
We’ll only specify which port to listen to for the moment as an example.
Ok, now we can create a Go file in our favourite text editor or IDE. Let’s load our .env file and start a server on the specified port:
// msgme.go

package main

import (
    "log"
    "net/http"
    "os"

    "github.com/joho/godotenv"
)

func main() {
    if err := godotenv.Load(); err != nil {
        log.Fatalf("Failed to load .env file: %s", err)
    }

    var valid bool
    var port_num string

    if port_num, valid = os.LookupEnv("PORT"); !valid {
        log.Fatal("Missing PORT environment variable")
    }

    log.Fatal(http.ListenAndServe(":"+port_num, nil))
}
You can run your code with go run to make sure that it compiles properly and that it is completely useless.
Sending an email
In this article I’ll focus on sending an email using Gmail. Google requires untrusted apps to have an “application password” to get access to our email account. A guide on how to obtain an application password for your own app can be found here.
Once you have acquired your oh-so-precious application password, it’s time to add a few variables to our .env file:
AUTH_USERNAME=<your Gmail address associated with the app password>
APPLICATION_PASSWORD=<your app password>
AUTH_SERVER=smtp.gmail.com
SENDER=<the sending email address>
RECIPIENT=<the email address to send the message to>
SENDING_SERVER=smtp.gmail.com:587
Note that AUTH_USERNAME and SENDER will most likely be the same in all use cases as far as I know, but I separated them just in case.
Now, we’ll create a function to handle requests to our service. The SMTP implementation in the Go standard library uses a PlainAuth object to store credentials to pass with the request to the email service provider. Since I expected my service to receive upwards of 10,000 requests per minute, I used a function closure to avoid creating a new PlainAuth object on the heap for each request.
The Garbage Collector is the devil - Hugo Bde
Here’s the code to create our request handler:
// msgme.go

//...

import (
    "log"
    "net/http"
    "net/smtp"  // Add the net/smtp package
    "os"

    "github.com/joho/godotenv"
)

// ...

func generateRequestHandler() func(http.ResponseWriter, *http.Request) {
    var valid bool

    // Environment variables
    var app_pwd string
    var username string
    var auth_server string
    var sender string
    var recipient string
    var sending_server string

    // Read environment variables
    if app_pwd, valid = os.LookupEnv("APPLICATION_PASSWORD"); !valid {
        log.Fatal("APPLICATION_PASSWORD environment variable not set")
    }

    // Repeat for all the other environment variables above

    // Create our Auth object. The first parameter "identity" can be omitted
    auth := smtp.PlainAuth("", username, app_pwd, auth_server)

    return func (w http.ResponseWriter, r *http.Request) {
        // This function will capture the variables in generateRequestHandler
    }
}

// ...

func main() {

    // ...

    // Create a handler using our closure generator
    requestHandler := generateRequestHandler()

    // Route handler to the path of your choice
    http.HandleFunc("/", requestHandler)

    log.Fatal(http.ListenAndServe(":"+port_num, nil))
}
Now, let’s focus on the request handling code itself. In my case, the contact form has 4 fields, contact_name, contact_email, contact_phone_no and msg_body. Here’s how we extract them from the request body and send them in an email:
// msgme.go

// ...

func generateRequestHandler() func(http.ResponseWriter, *http.Request) {

    // ...

    // Create our Auth object. The first parameter "identity" can be omitted
    auth := smtp.PlainAuth("", username, app_pwd, auth_server)

    return func (w http.ResponseWriter, r *http.Request) {
        // Ensure we were called using a POST method
        if r.Method != "POST" {
            w.WriteHeader(405)
            return
        }

        // Parse the request form data into r.PostForm, which we'll retrieve using r.FormValue
        if err := r.ParseForm(); err != nil {
            logger.Error(err)
            w.WriteHeader(500)
            return
        }

        // Build message from form data
        msg: = [] byte(fmt.Sprintf("Subject: Website Enquiry Form\r\n" +
            "From: hugobde.dev\r\n" +
            "To: %s\r\n\r\n" + // The double CRLF marks the end of the headers and the start of the message body
            "Name: %s\r\n" +
            "Contact Email: %s\r\n" +
            "Contact Phone Number: %s\r\n\r\n" +
            "Body: %s",
            recipient,
            r.FormValue("contact_name"),
            r.FormValue("contact_email"),
            r.FormValue("contact_phone_no"),
            r.FormValue("msg_body")))

        // Send Email to myself
        err := smtp.SendMail(sending_server, auth, sender, []string{recipient}, msg)

        if err != nil {
            logger.Error(err)
            w.WriteHeader(500)
            return
        }
    }
}
And voilà!, our code is ready to hit production without any form of testing whatsoever. All we need to do now is containerise our service with Docker.
Containerisation
First try
Create a file called Dockerfile in your project root folder and add this to it:
FROM golang
WORKDIR /msgme
COPY go.mod go.sum .
RUN go mod download
COPY msgme.go .
RUN go build -o msgme .
COPY .env .
EXPOSE <the port you specified in your .env file>
CMD ["./msgme"]
We can build the docker image with this command:
$ docker build -t msgme .
While we wait for the process to complete, I want to bring your attention to the order of the commands in our Dockerfile. You’ll notice that we don’t copy all the files at the start and instead copy them as they are needed throughout the build process. We do this to leverage Docker’s layer caching: if Docker notices that our msgme.go file has not changed since the last cached image build, it won’t bother running go build again. However, if we had copied all the files at once, a change to our .env config would have caused Docker to compile our code again for no reason. As a general rule of thumb, try to copy the files least likely to change first and vice-versa.
Now that the build is complete, I want you to run to have a look at the size of the image we produced:
$ docker image ls
REPOSITORY   TAG       IMAGE ID       CREATED          SIZE
msgme        latest    d23a3b74a812   14 minutes ago   942MB
942MB. That’s a lot of space for such a simple service. Let’s see if we can reduce that image size a little.
Multi-stage build to the rescue
The reason the image we just built takes up so much space is because it contains a full operating system, as well as the Go toolchain. Using a multi-stage build, we can compile our code in a first image, before copying our executable to a more minimalist base image like scratch (completely empty) or alpine (super-lightweight OS). Let’s take things to the extreme and create our final image from scratch.
# Builder image
FROM golang:1.20 AS BUILDER
WORKDIR /app
COPY go.mod go.sum .
RUN go mod download
COPY msgme.go .
RUN CGO_ENABLED=0 go build -o msgme .

# App image
FROM scratch
WORKDIR /
COPY .env .
COPY --from=BUILDER /app/msgme .
EXPOSE <the port you specified in your .env file>
CMD ["/msgme"]
Let me take you through this build process. We start with the same image as before, but this time we’ll give this image an alias BUILDER which we’ll use to refer to it later. The next notable difference is this CGO_ENABLED=0 statement when compiling our code. By default, the Go compiler links our code against the standard C library, usually glibc. However, since we decided to use the scratch image, glibc will not be available when we try to run our program, thus we tell the compiler to statically link our code by setting the CGO_ENABLED environment variable to 0.
After compiling the code, we create a new image, this time starting from scratch, and we tell Docker to look in our BUILDER image to copy our freshly built executable using the --from flag.
Build your image and check its size again to see how much space we managed to save:
$ docker image ls
REPOSITORY   TAG       IMAGE ID       CREATED          SIZE
msgme        latest    26c9fc7bfc5d   3 minutes ago    7.65MB
From 942MB to 7.65MB, not bad at all! Just keep in mind that if you run into issues with the scratch image and try to debug the final image, you won’t even have a shell or any utilities to analyse the content of the container. I recommend you use the alpine image instead, as it only adds about 7MB to the final image size.
Running our project
To try our project, we can simply run this command:
$ docker run -p "3000:3000" msgme .
The -p flag maps the containers port 3000 to our machines port 3000.
Finally, we can send a request to our service using curl:
curl -X POST \
    -d msg_body="test message" \
    -d contact_email=my_email@test.com \
    -d contact_phone_no=0444444444 \
    localhost:3000/contact_form
You should soon receive a message in your inbox, or an error message in your terminal. Either way, you should have something to play around with for the next day or so.
Conclusion
This project was a nice introduction to the deployment of Go applications with the help of Docker and ways to optimise the image build process. I hope this article was helpful to you, if you have any comments you can keep them for yourself because I haven’t implemented a comment section yet. Also make sure to check back in the next few weeks if you’d like to read more about the infrastructure I implemented to build this blog.